
An online booking system lets customers see available times, choose a service or team member, submit their details, and receive confirmation without waiting for a business to answer the phone. For the business, it replaces scattered messages and manual calendar checks with availability rules, conflict protection, reminders, customer records, and measurable follow-up.
This guide explains how to create an online booking system in HighLevel from the ground up. You will choose the right calendar type, connect staff and external calendars, configure duration and availability, add intake questions, customize the booking page, activate confirmations and reminders, collect payments when appropriate, embed the calendar on a website, and test the complete experience.
Table of contents
What are online booking systems?
Online booking systems are software tools that expose controlled availability to customers and convert a selected time into a confirmed appointment or reservation. A complete system is more than a public calendar. It normally includes a booking interface, staff or resource availability, conflict checking, customer data capture, notifications, cancellation and rescheduling rules, integrations, and reporting.
If you want the conceptual definition, architecture, and differences between appointment booking, reservation, and scheduling software, read our separate guide: What Is an Online Appointment Booking System? This article stays focused on implementation.
How online booking system works from click to confirmation
- The business publishes availability. Working hours, buffers, notice periods, duration, staff schedules, and connected-calendar conflicts determine which slots can be offered.
- The visitor chooses a service and time. The widget displays times in the configured or detected timezone.
- The visitor submits contact and intake data. A basic form captures identity and communication details; custom fields can qualify the booking.
- The system validates the slot. It checks calendar rules, conflicts, capacity, staff, rooms, or equipment.
- The booking is created. The customer record and appointment are stored, a payment can be collected, and a confirmation page appears.
- Automations begin. Confirmation, reminders, rescheduling, internal alerts, follow-up, and no-show workflows run from the appointment record.
How to choose an online booking system
Do not choose solely by the appearance of the calendar. Evaluate whether the system can enforce the rules that protect your time and whether it connects booking data to the rest of the customer journey.
| Requirement | Questions to ask | Why it matters |
|---|---|---|
| Calendar types | Does it support one-to-one, round robin, collective, class, service, and event bookings? | The wrong model creates routing and capacity problems. |
| Availability | Can you set buffers, minimum notice, date ranges, recurring schedules, and conflict calendars? | These rules prevent unrealistic or duplicate bookings. |
| Customer journey | Can visitors reschedule, cancel, pay, add guests, and receive reminders? | A booking is only the beginning of the experience. |
| CRM and automation | Does a booking update a contact, pipeline, tag, workflow, and reporting? | Disconnected calendars create manual follow-up. |
| Website delivery | Can you share a link, embed the widget, use a custom domain, and track conversions? | The booking experience must fit the acquisition channel. |
| Payments | Can you collect full payment, deposits, coupons, or recurring charges through supported gateways? | Payment rules affect commitment and operations. |
| Data and compliance | Can you capture consent, control access, retain records, and meet applicable privacy requirements? | Booking data can include sensitive information. |
HighLevel is a strong fit when the business wants calendars, CRM, forms, websites, conversations, reminders, workflows, payments, reputation management, and reporting in the same platform. A simple standalone scheduler may be sufficient when all you need is one calendar link and no broader customer automation.
Build your 24/7 booking experience
Use HighLevel calendars, forms, payments, reminders, CRM records and workflows from one account.
Start Your 30-Day HighLevel Trial
Affiliate disclosure: we may earn a commission if you start a trial through this link, at no additional cost to you. Messaging, phone, AI and payment processing may involve separate usage charges.
Plan before you make an online booking system
Before clicking Create Calendar, write down the operating rules. This prevents a technically functional page that creates bad appointments.
Offer
What exactly can be booked? Define name, description, duration, price, location, preparation, and expected outcome.
Availability
Which days and times are truly available? Add buffers, lunch, travel, preparation, and minimum notice.
Assignment
Should a specific person host, should bookings rotate, or must several team members attend together?
Qualification
Which questions, consent fields, payment, or eligibility rules must be completed before confirmation?
Communication
What confirmation, reminder, reschedule, cancellation, internal alert, and follow-up should send?
Measurement
Track views, started bookings, completed bookings, show rate, reschedules, revenue, source, and conversion.
Choose the correct HighLevel calendar type
| Calendar type | Best use | Example |
|---|---|---|
| Personal Booking | One host and one attendee | Consultation, interview, coaching call |
| Round Robin | Distribute appointments among available team members | Sales demos, multi-provider clinic |
| Collective | Require multiple team members to be available | Technical discovery with sales and engineering |
| Class | One host with multiple attendees and capacity | Workshop, webinar, group training |
| Service | Service, staff, price and duration selection | Salon, spa, repair, wellness service |
| Event | Scheduled event that does not require a host association | Seminar, open house, public session |
Visual tutorial: how to create an online booking system in HighLevel
The screenshots in this tutorial come from current official HighLevel documentation. Labels can evolve, but the workflow remains the same. Build first in a test calendar or low-risk service.
Step 1: Open Calendar Settings
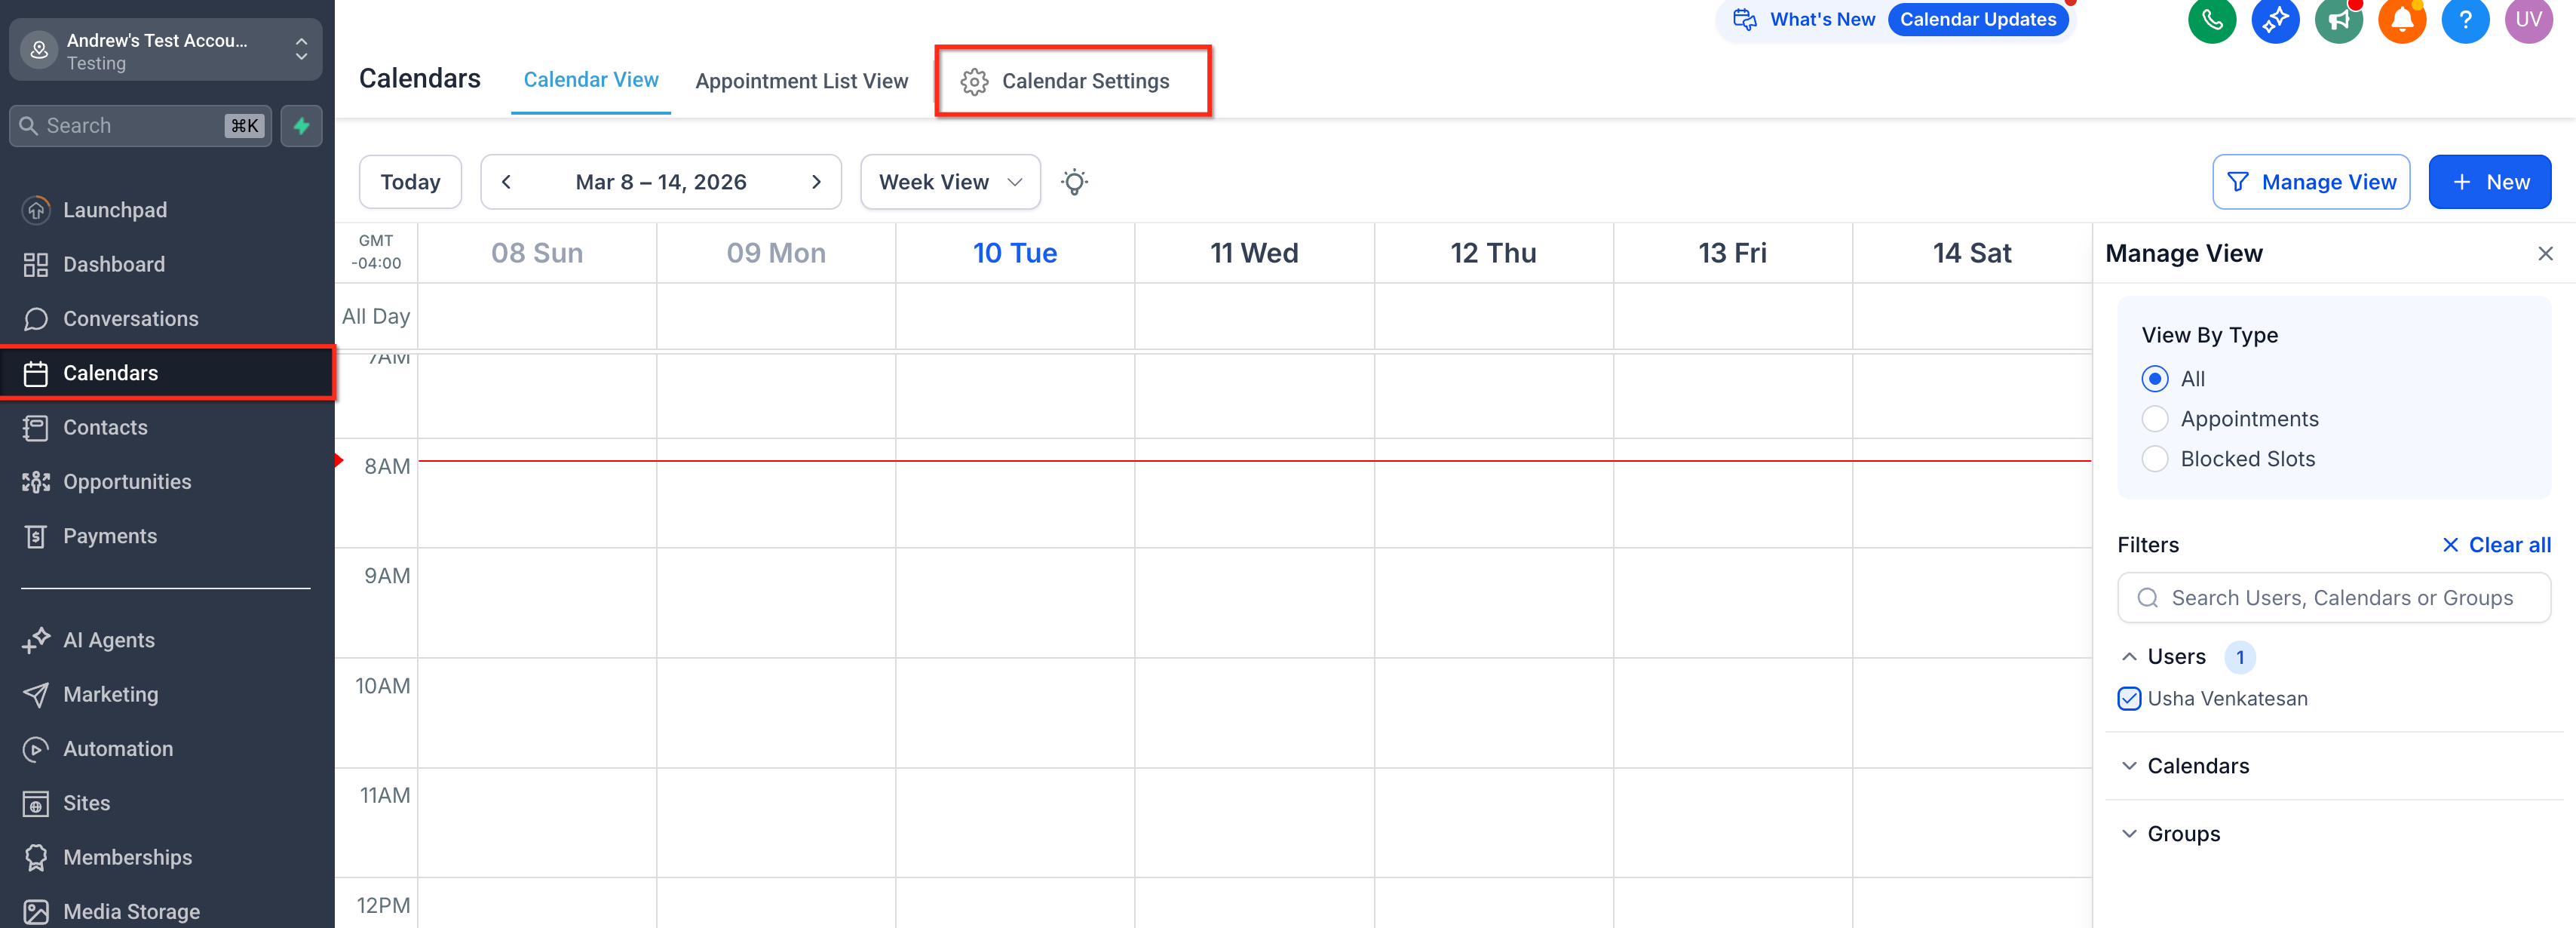
Enter the correct HighLevel sub-account. Go to Calendars → Calendar Settings. This is the control center for calendars, groups, service menus, rooms, equipment, preferences, and connections.
Step 2: Create a new calendar
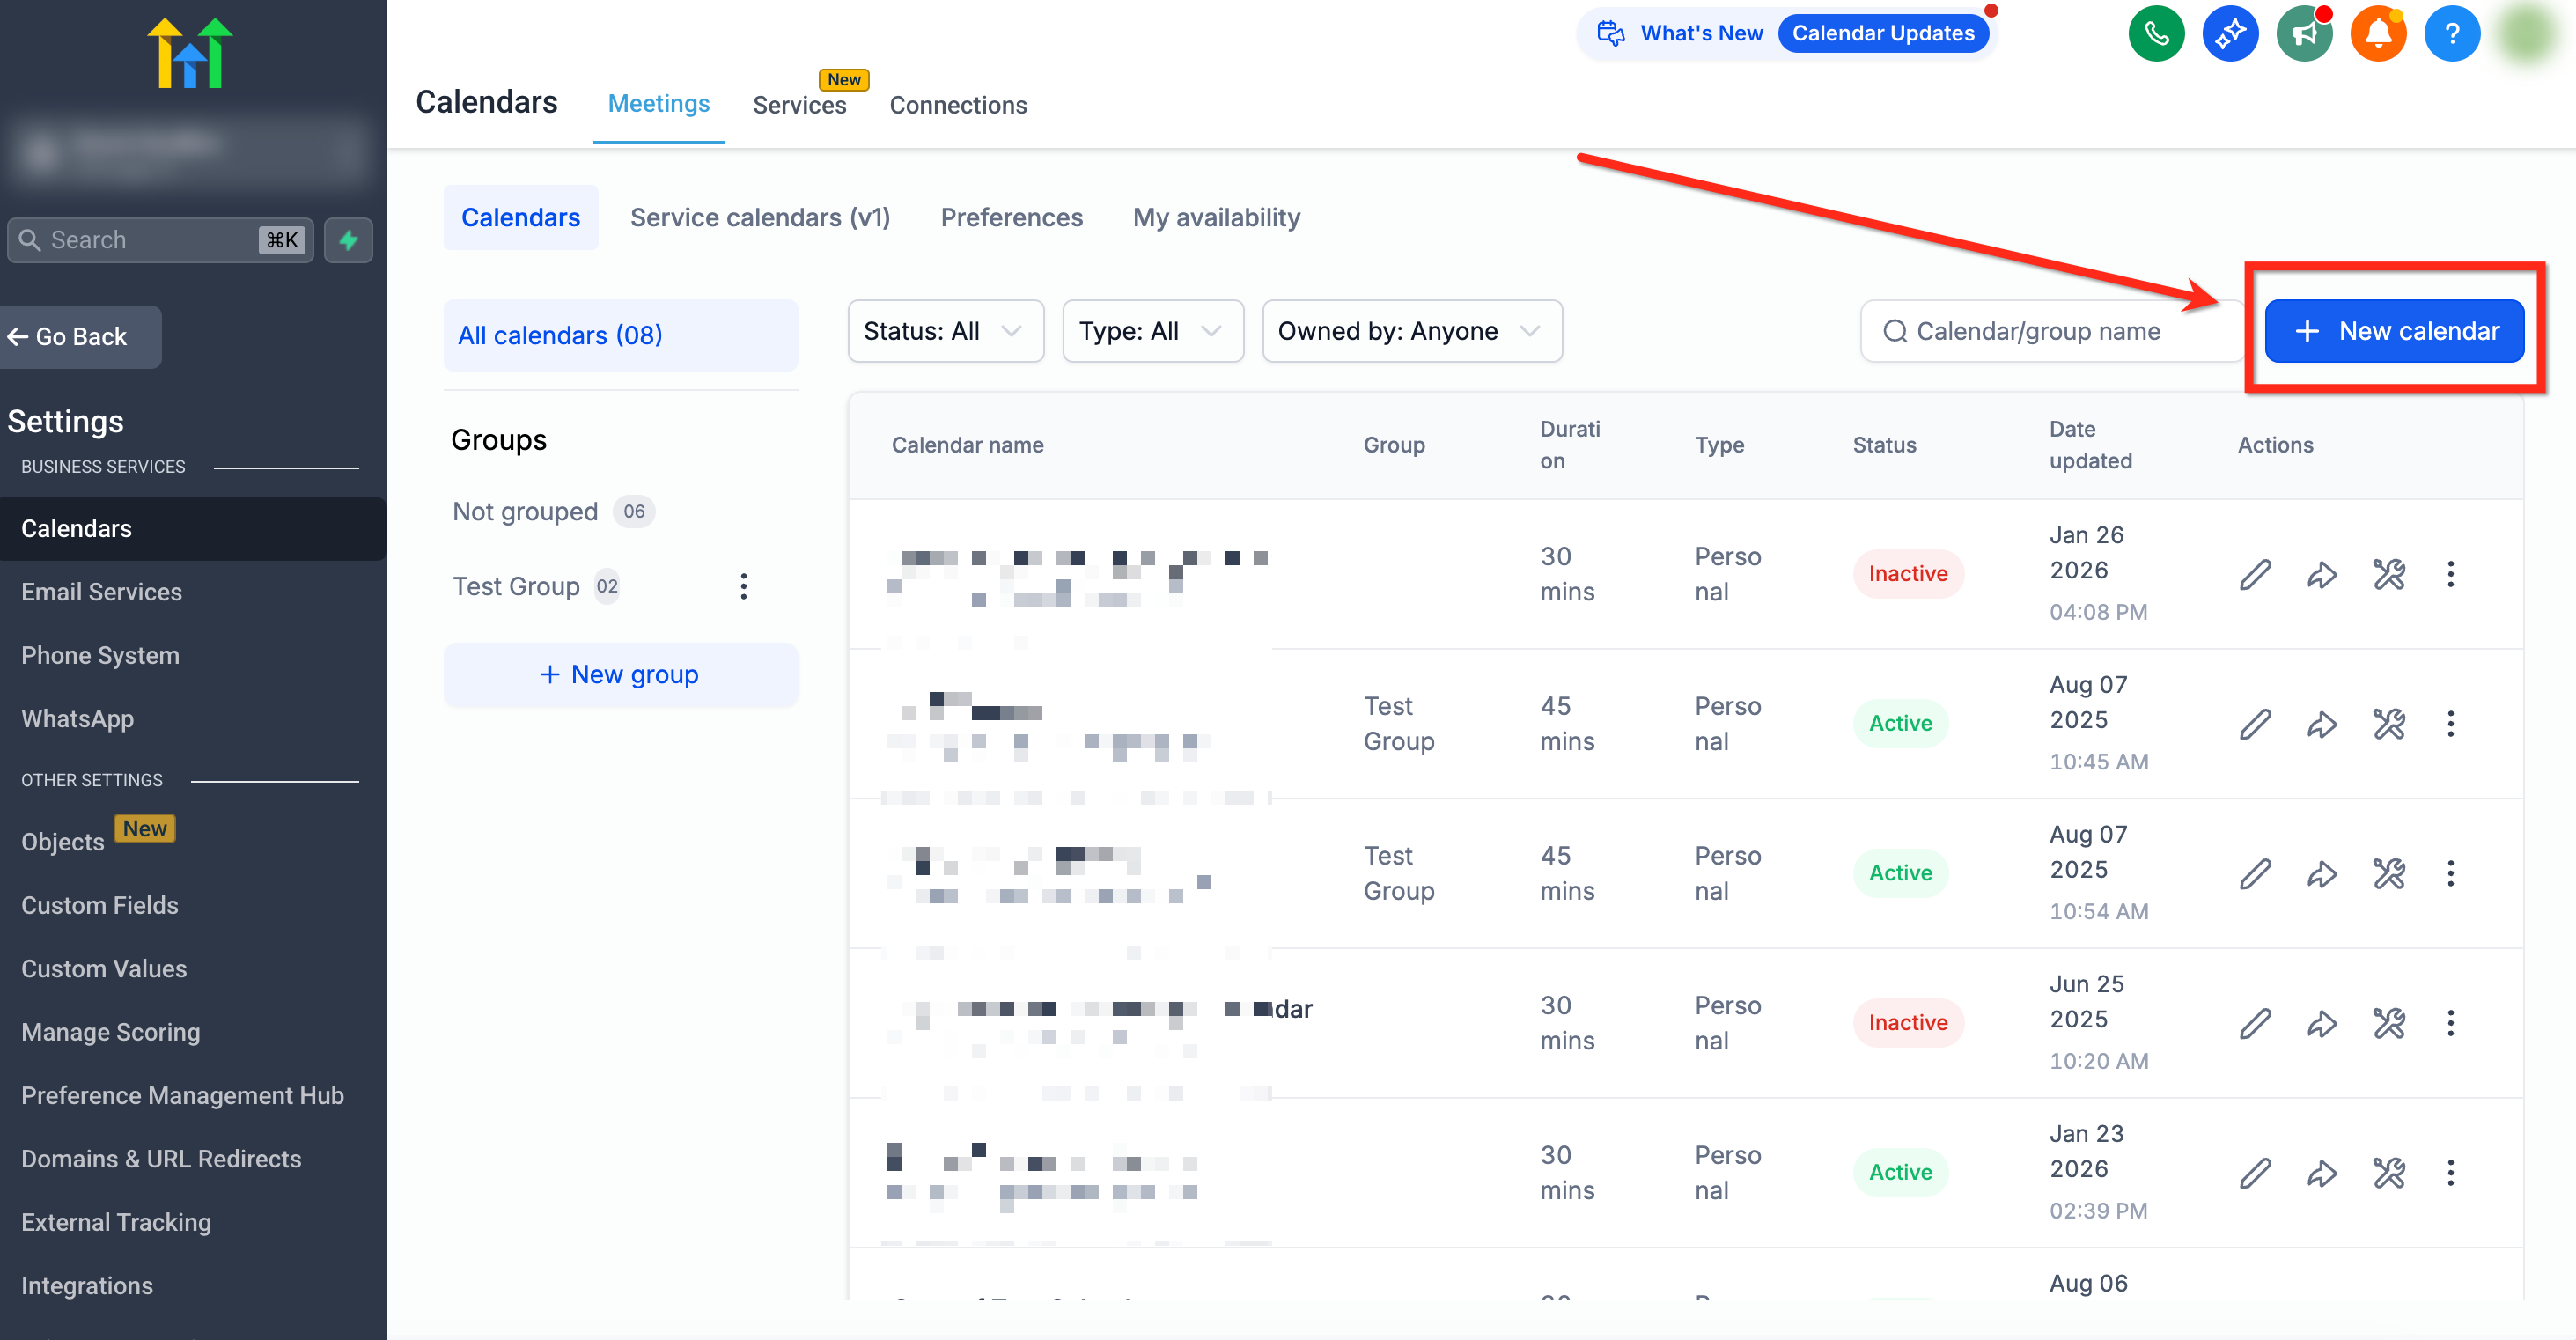
Click New Calendar. If you already have calendars, do not duplicate one until you understand its forms, notifications, availability, and workflow dependencies.
Step 3: Select the calendar type
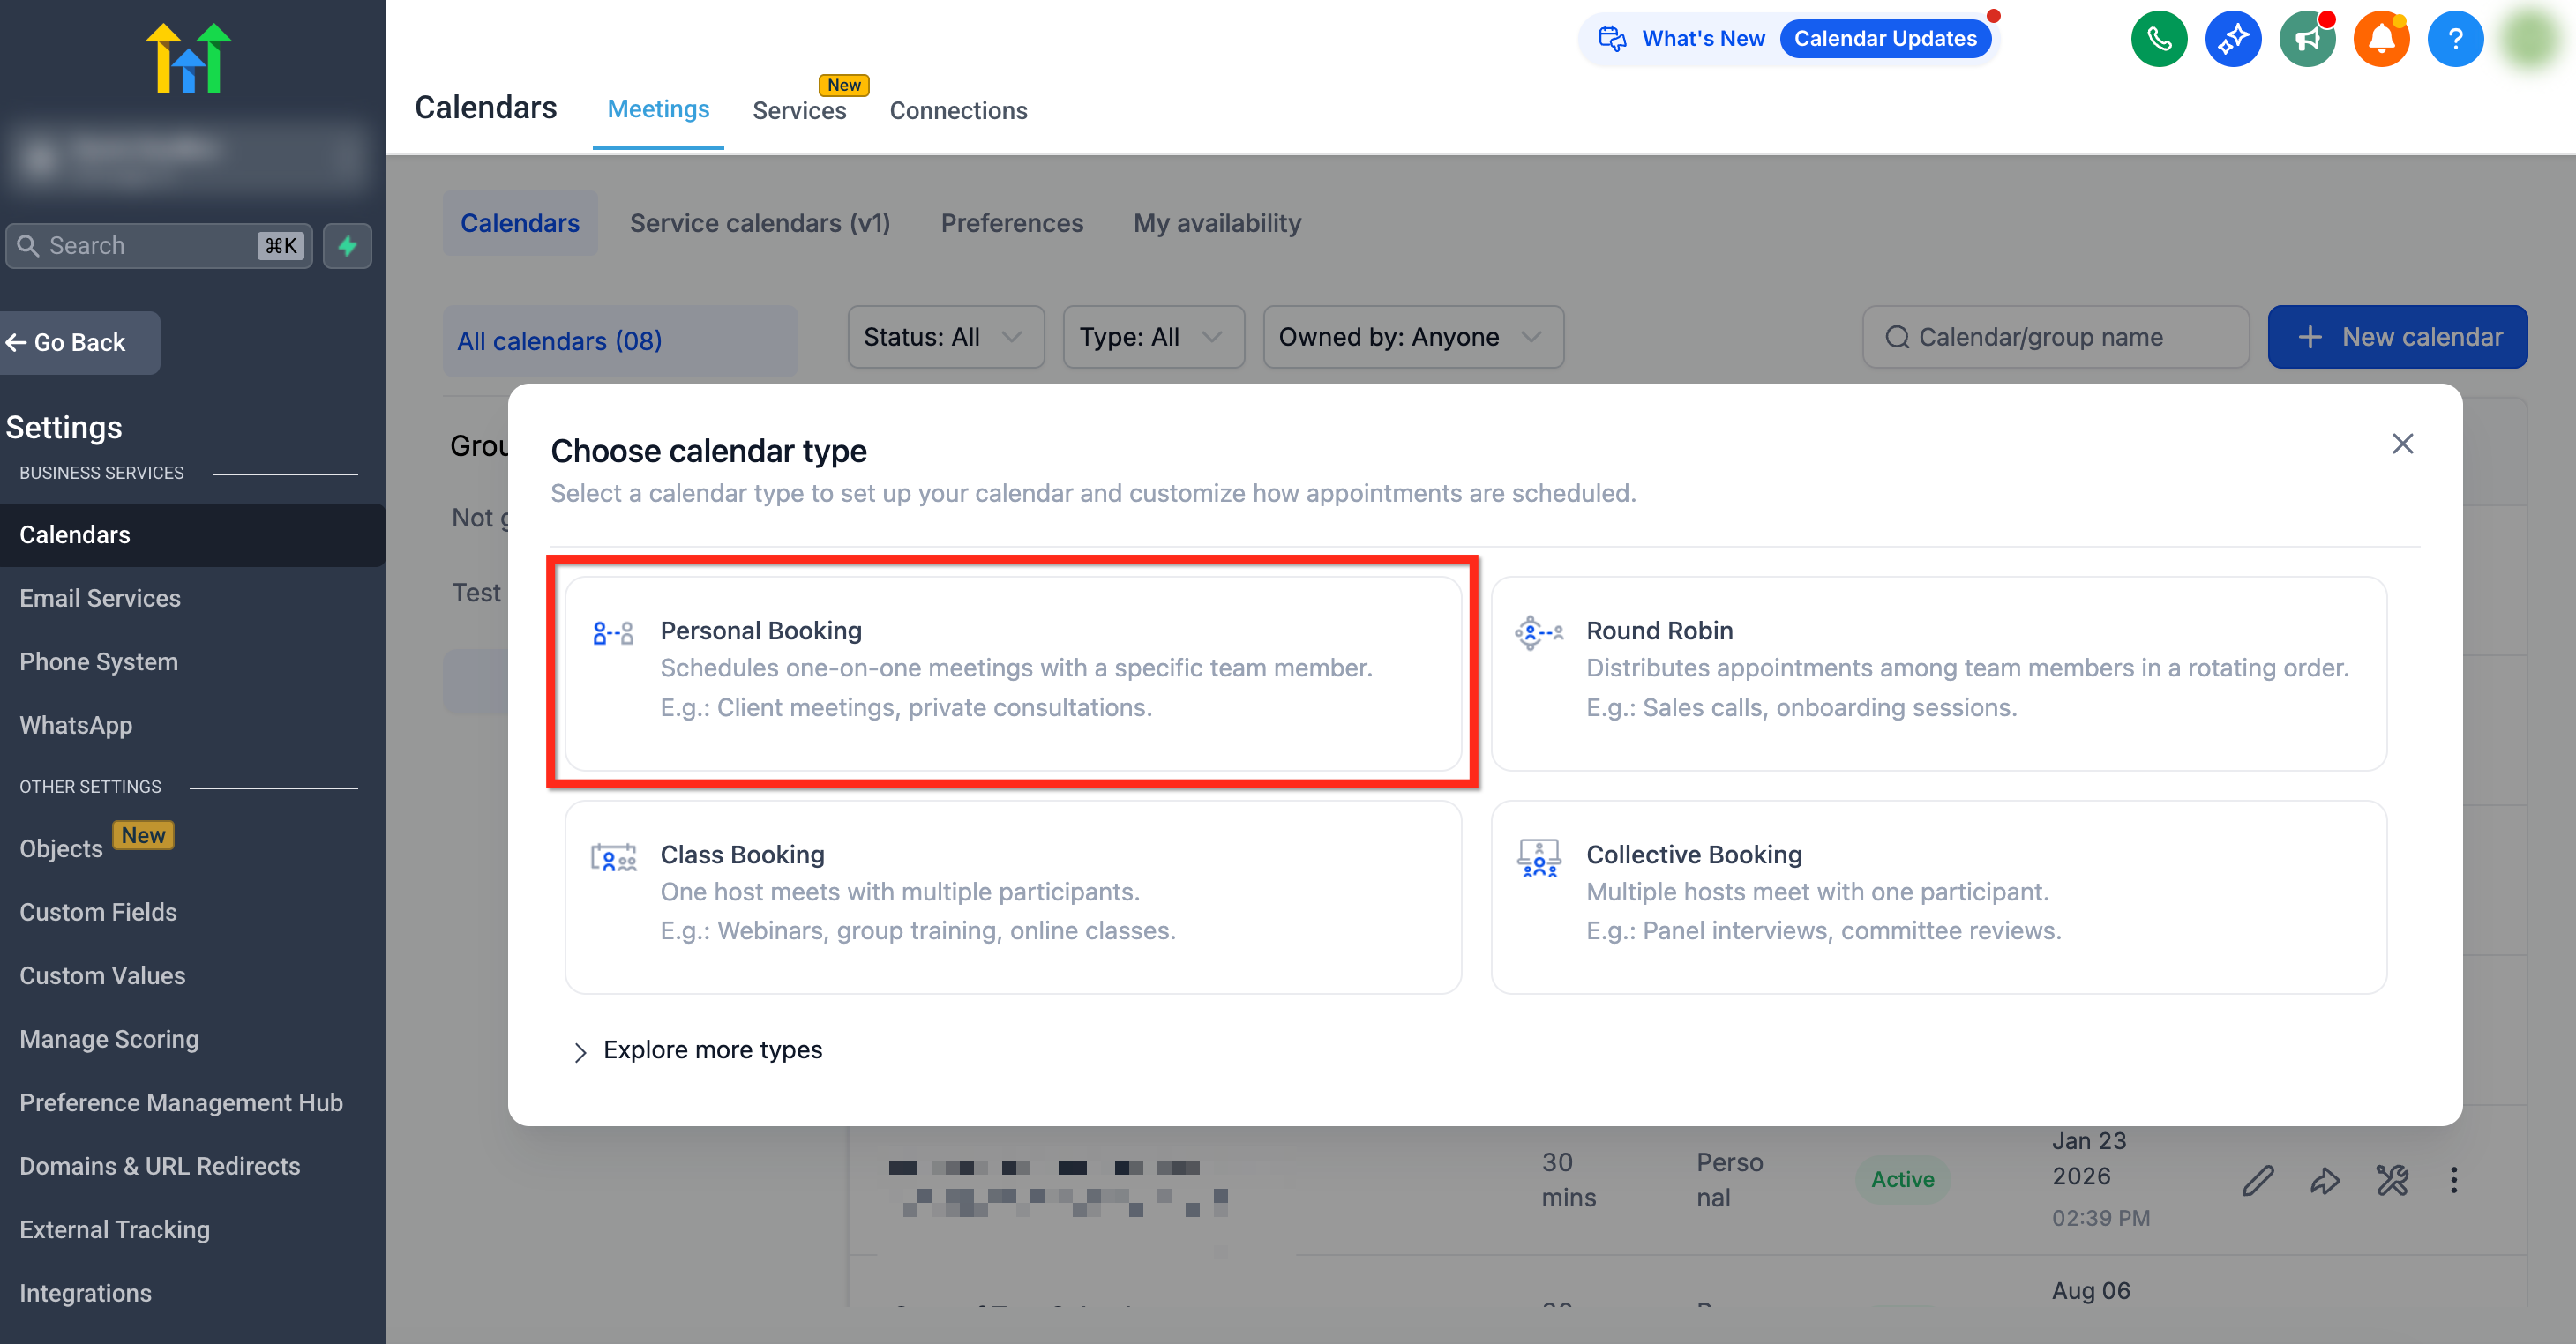
Choose the model that matches the real booking logic. For a solo one-to-one meeting, select Personal Booking. Use Round Robin for distribution, Collective for joint availability, Class for capacity, Service for service-based selection, or Event for shared scheduled events.
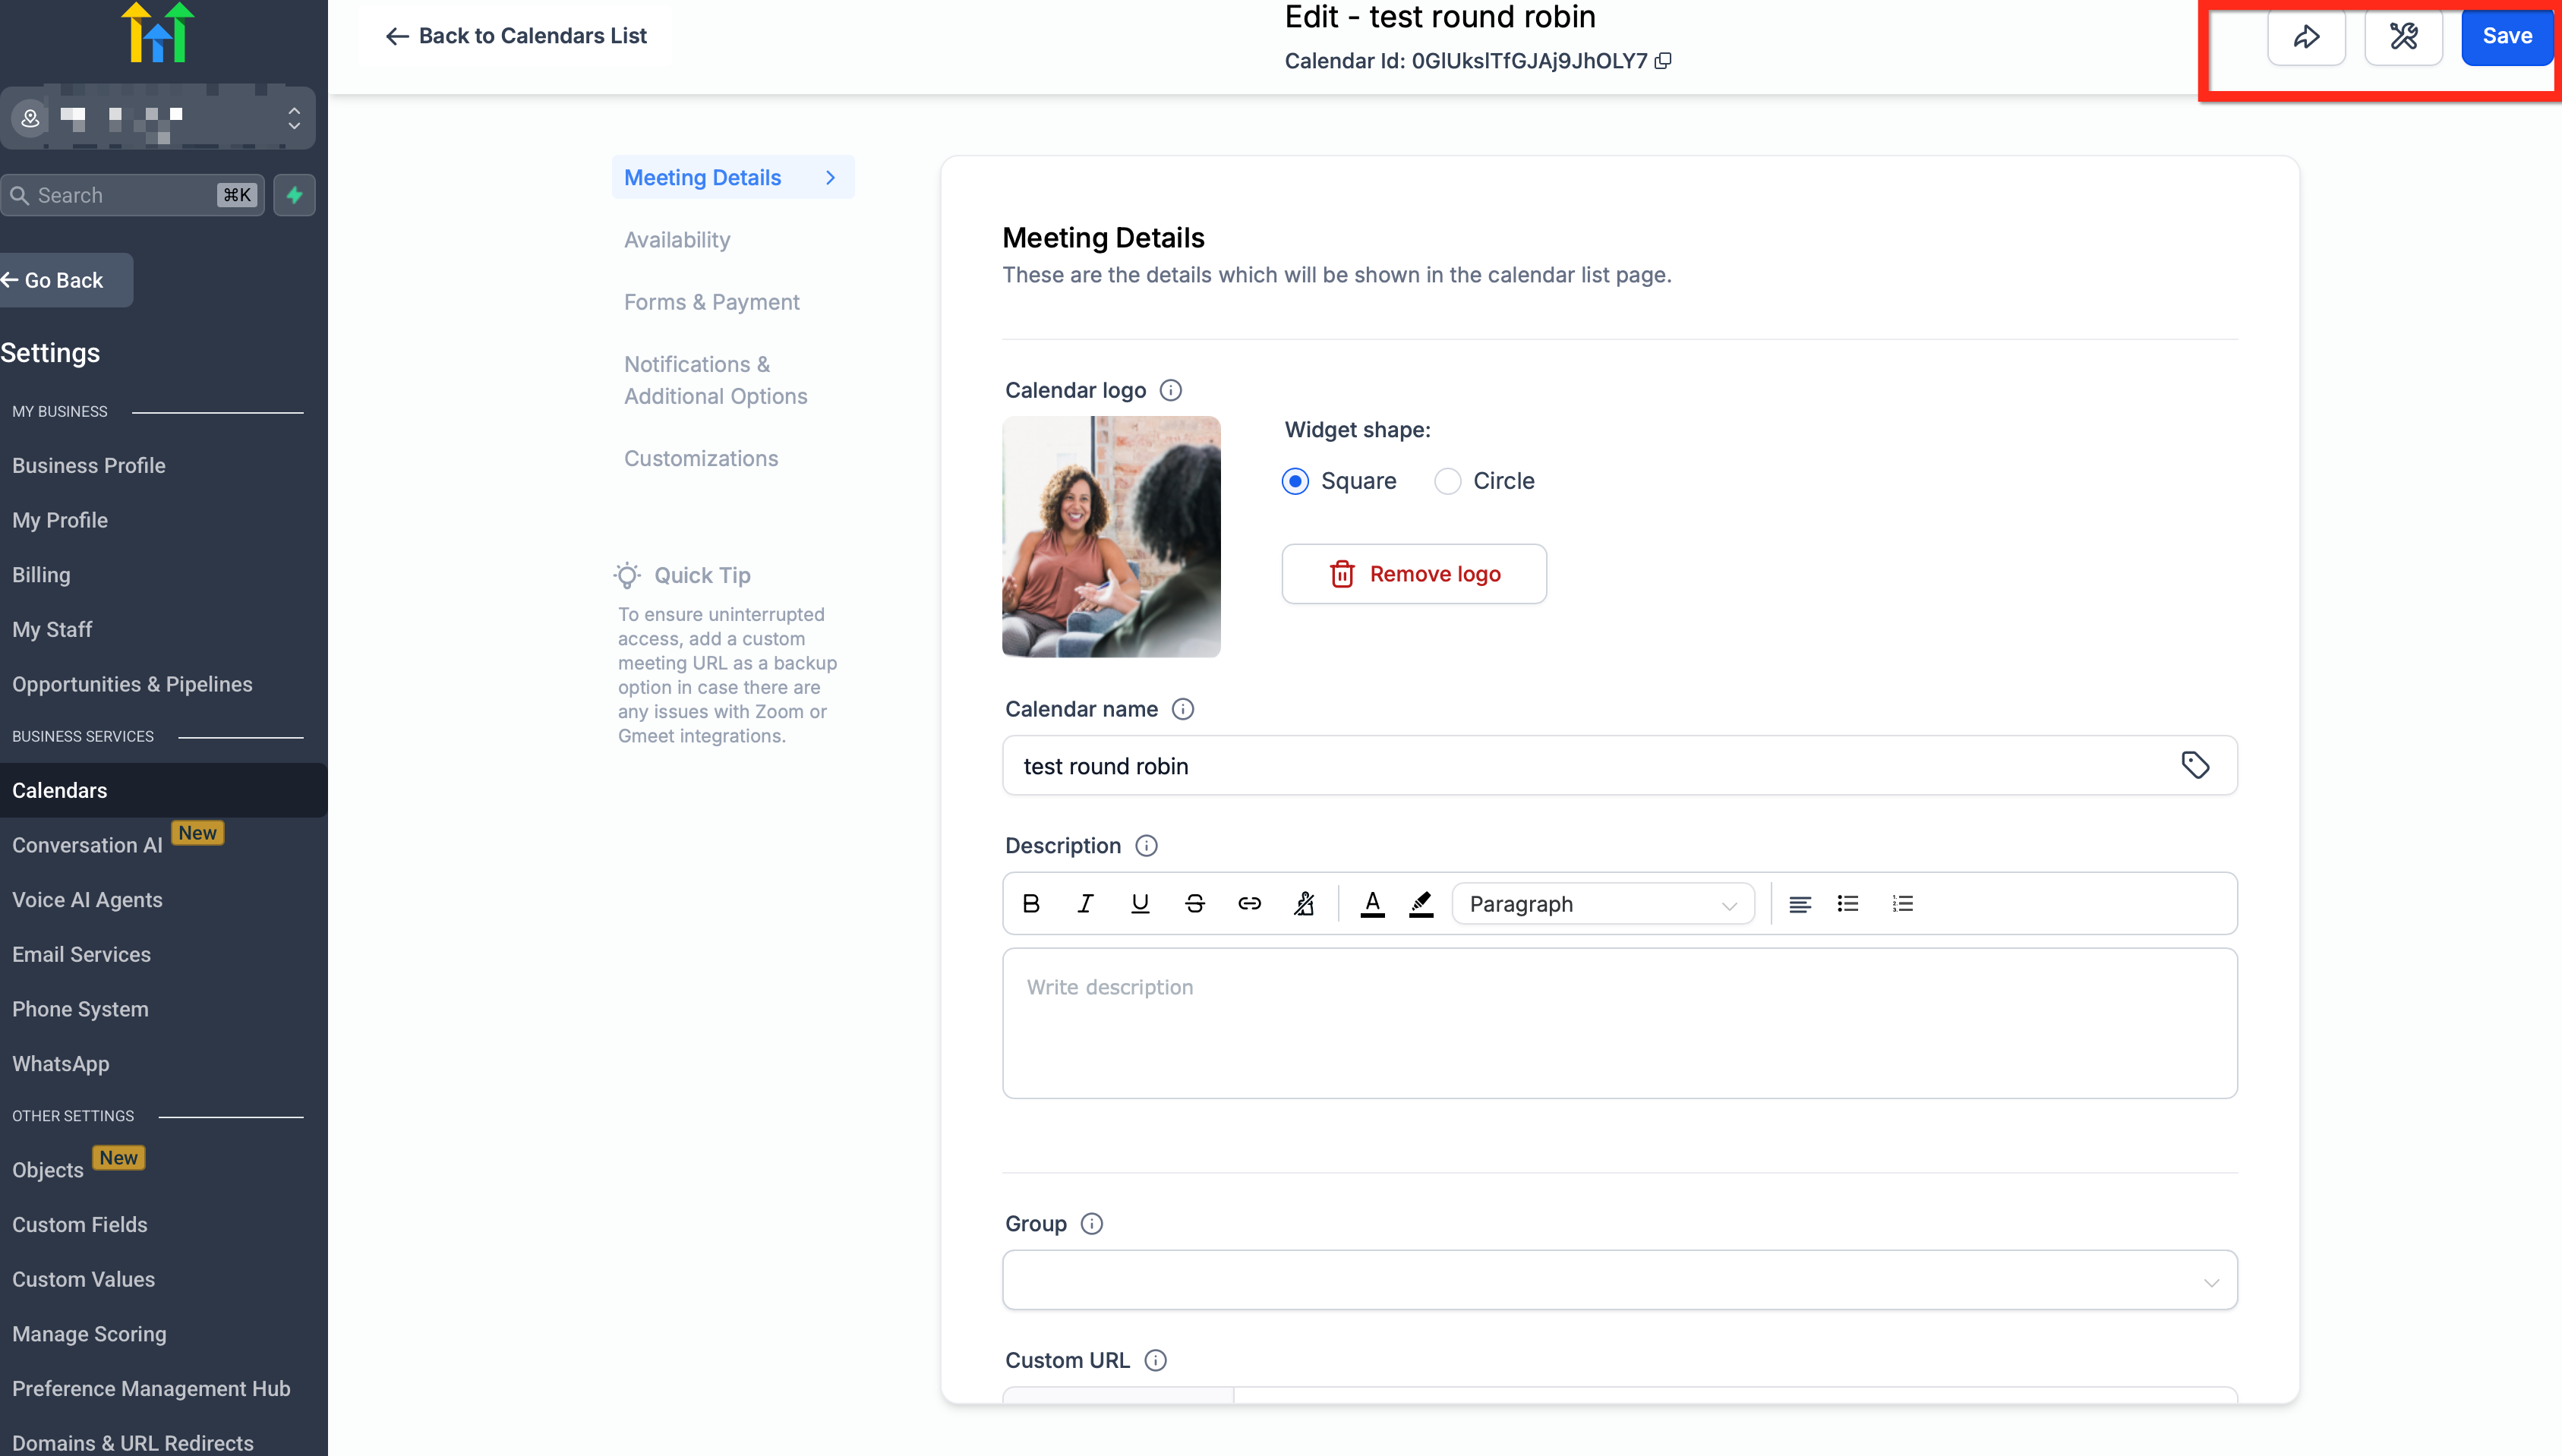
Step 4: Add the booking details and host
Enter a customer-facing name, select the host or staff, review the slug, set the appointment duration, define the location, and configure initial availability. Use a descriptive title such as “30-Minute Marketing Consultation,” not an internal code.
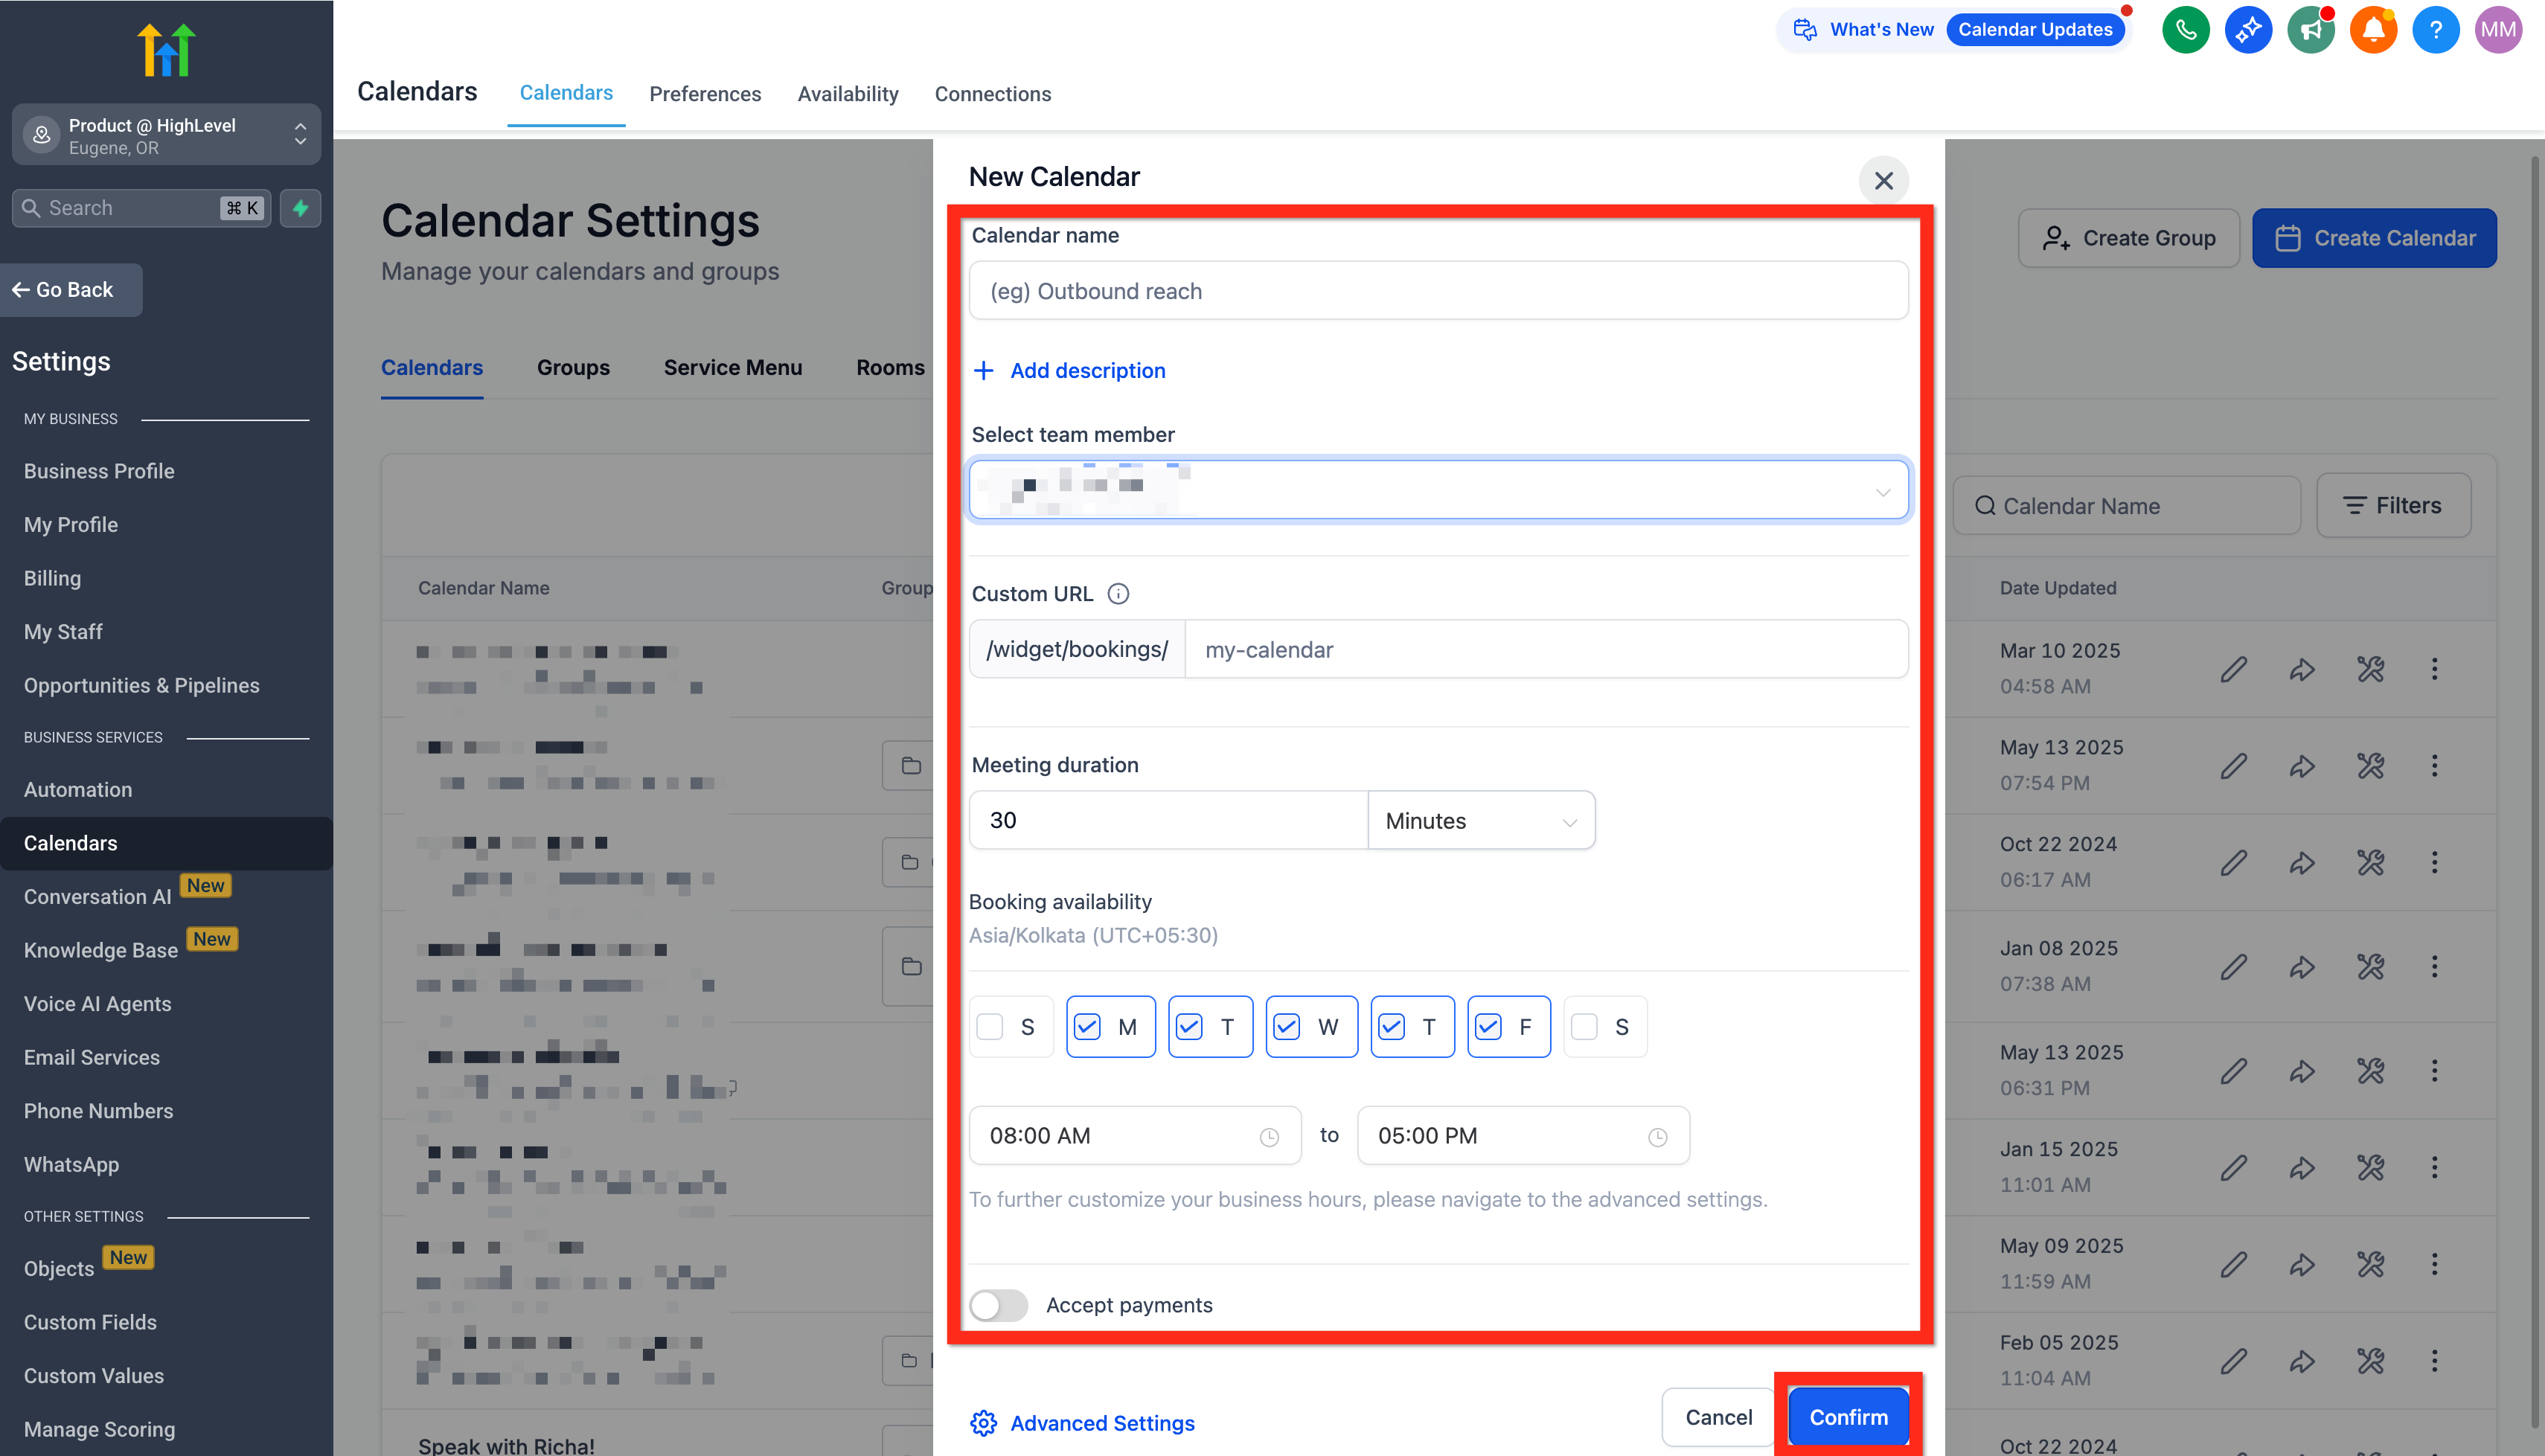
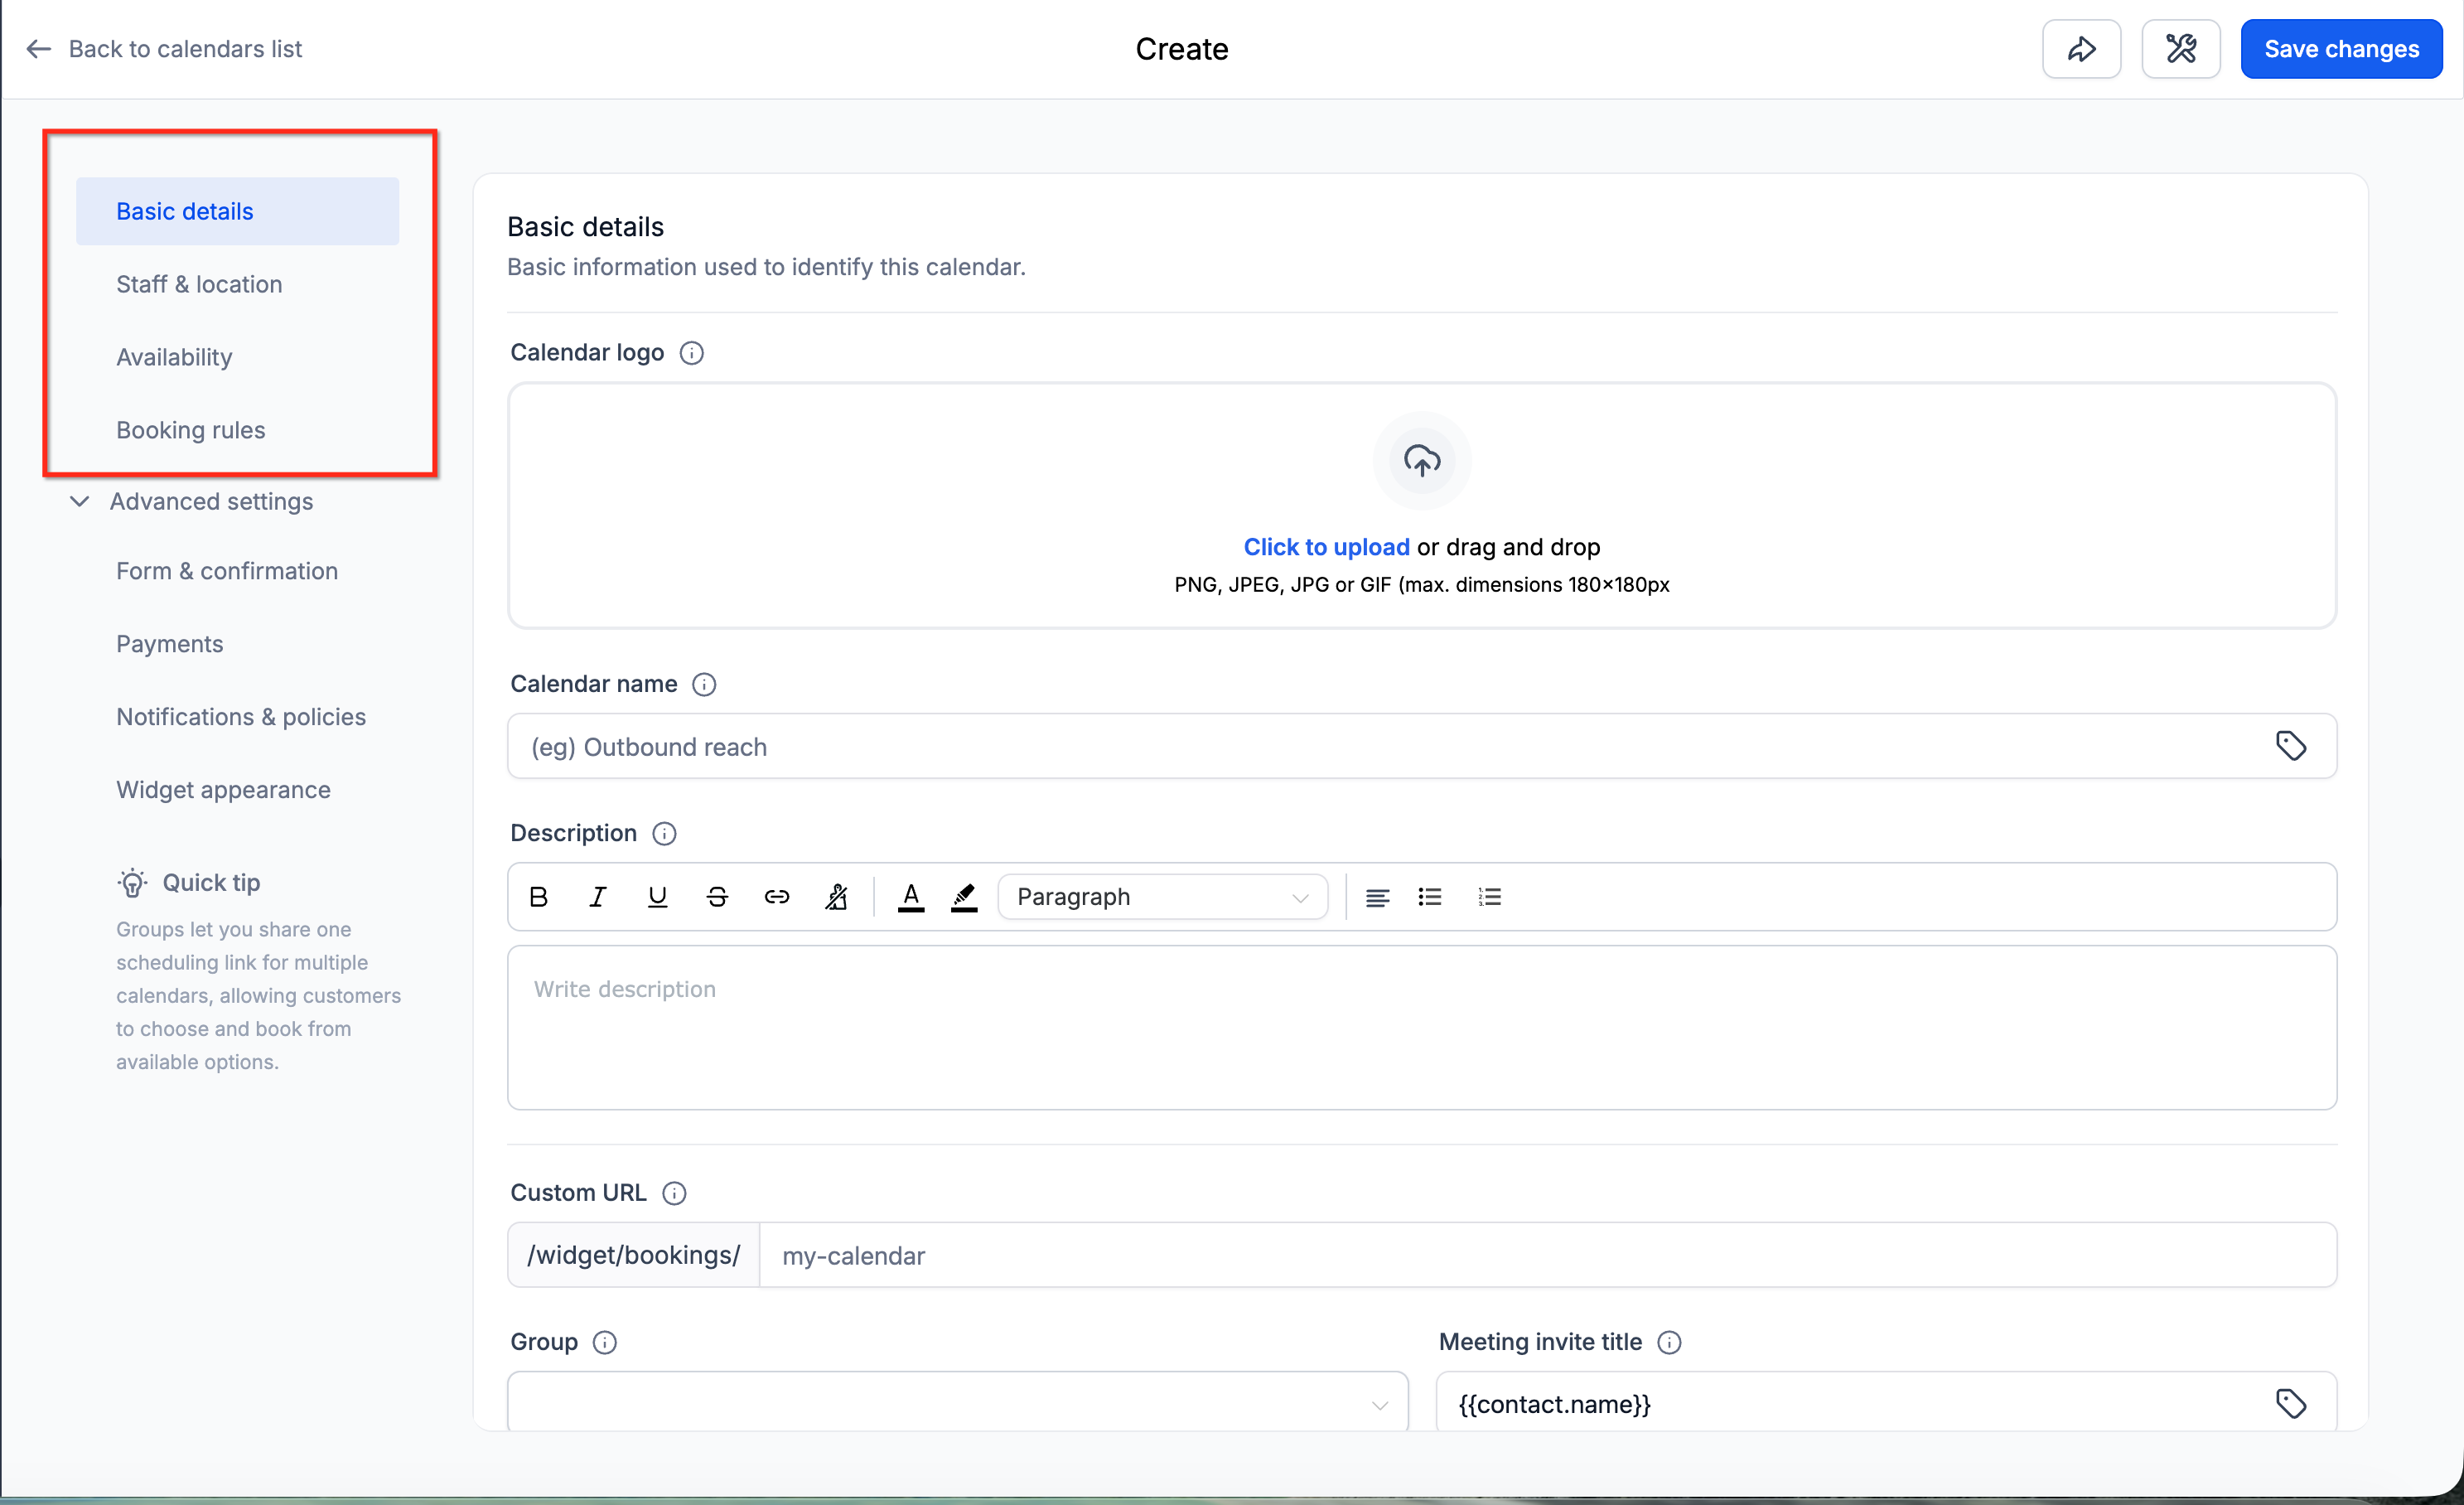
Step 5: Configure availability and booking rules
Review Basic details, Staff & location, Availability, Booking rules, and Advanced settings. Add minimum notice, date range, slot interval, buffers, limits, confirmation behavior, and rescheduling rules. Connect conflict calendars so busy external events block public availability.
Step 6: Add an intake or qualification form
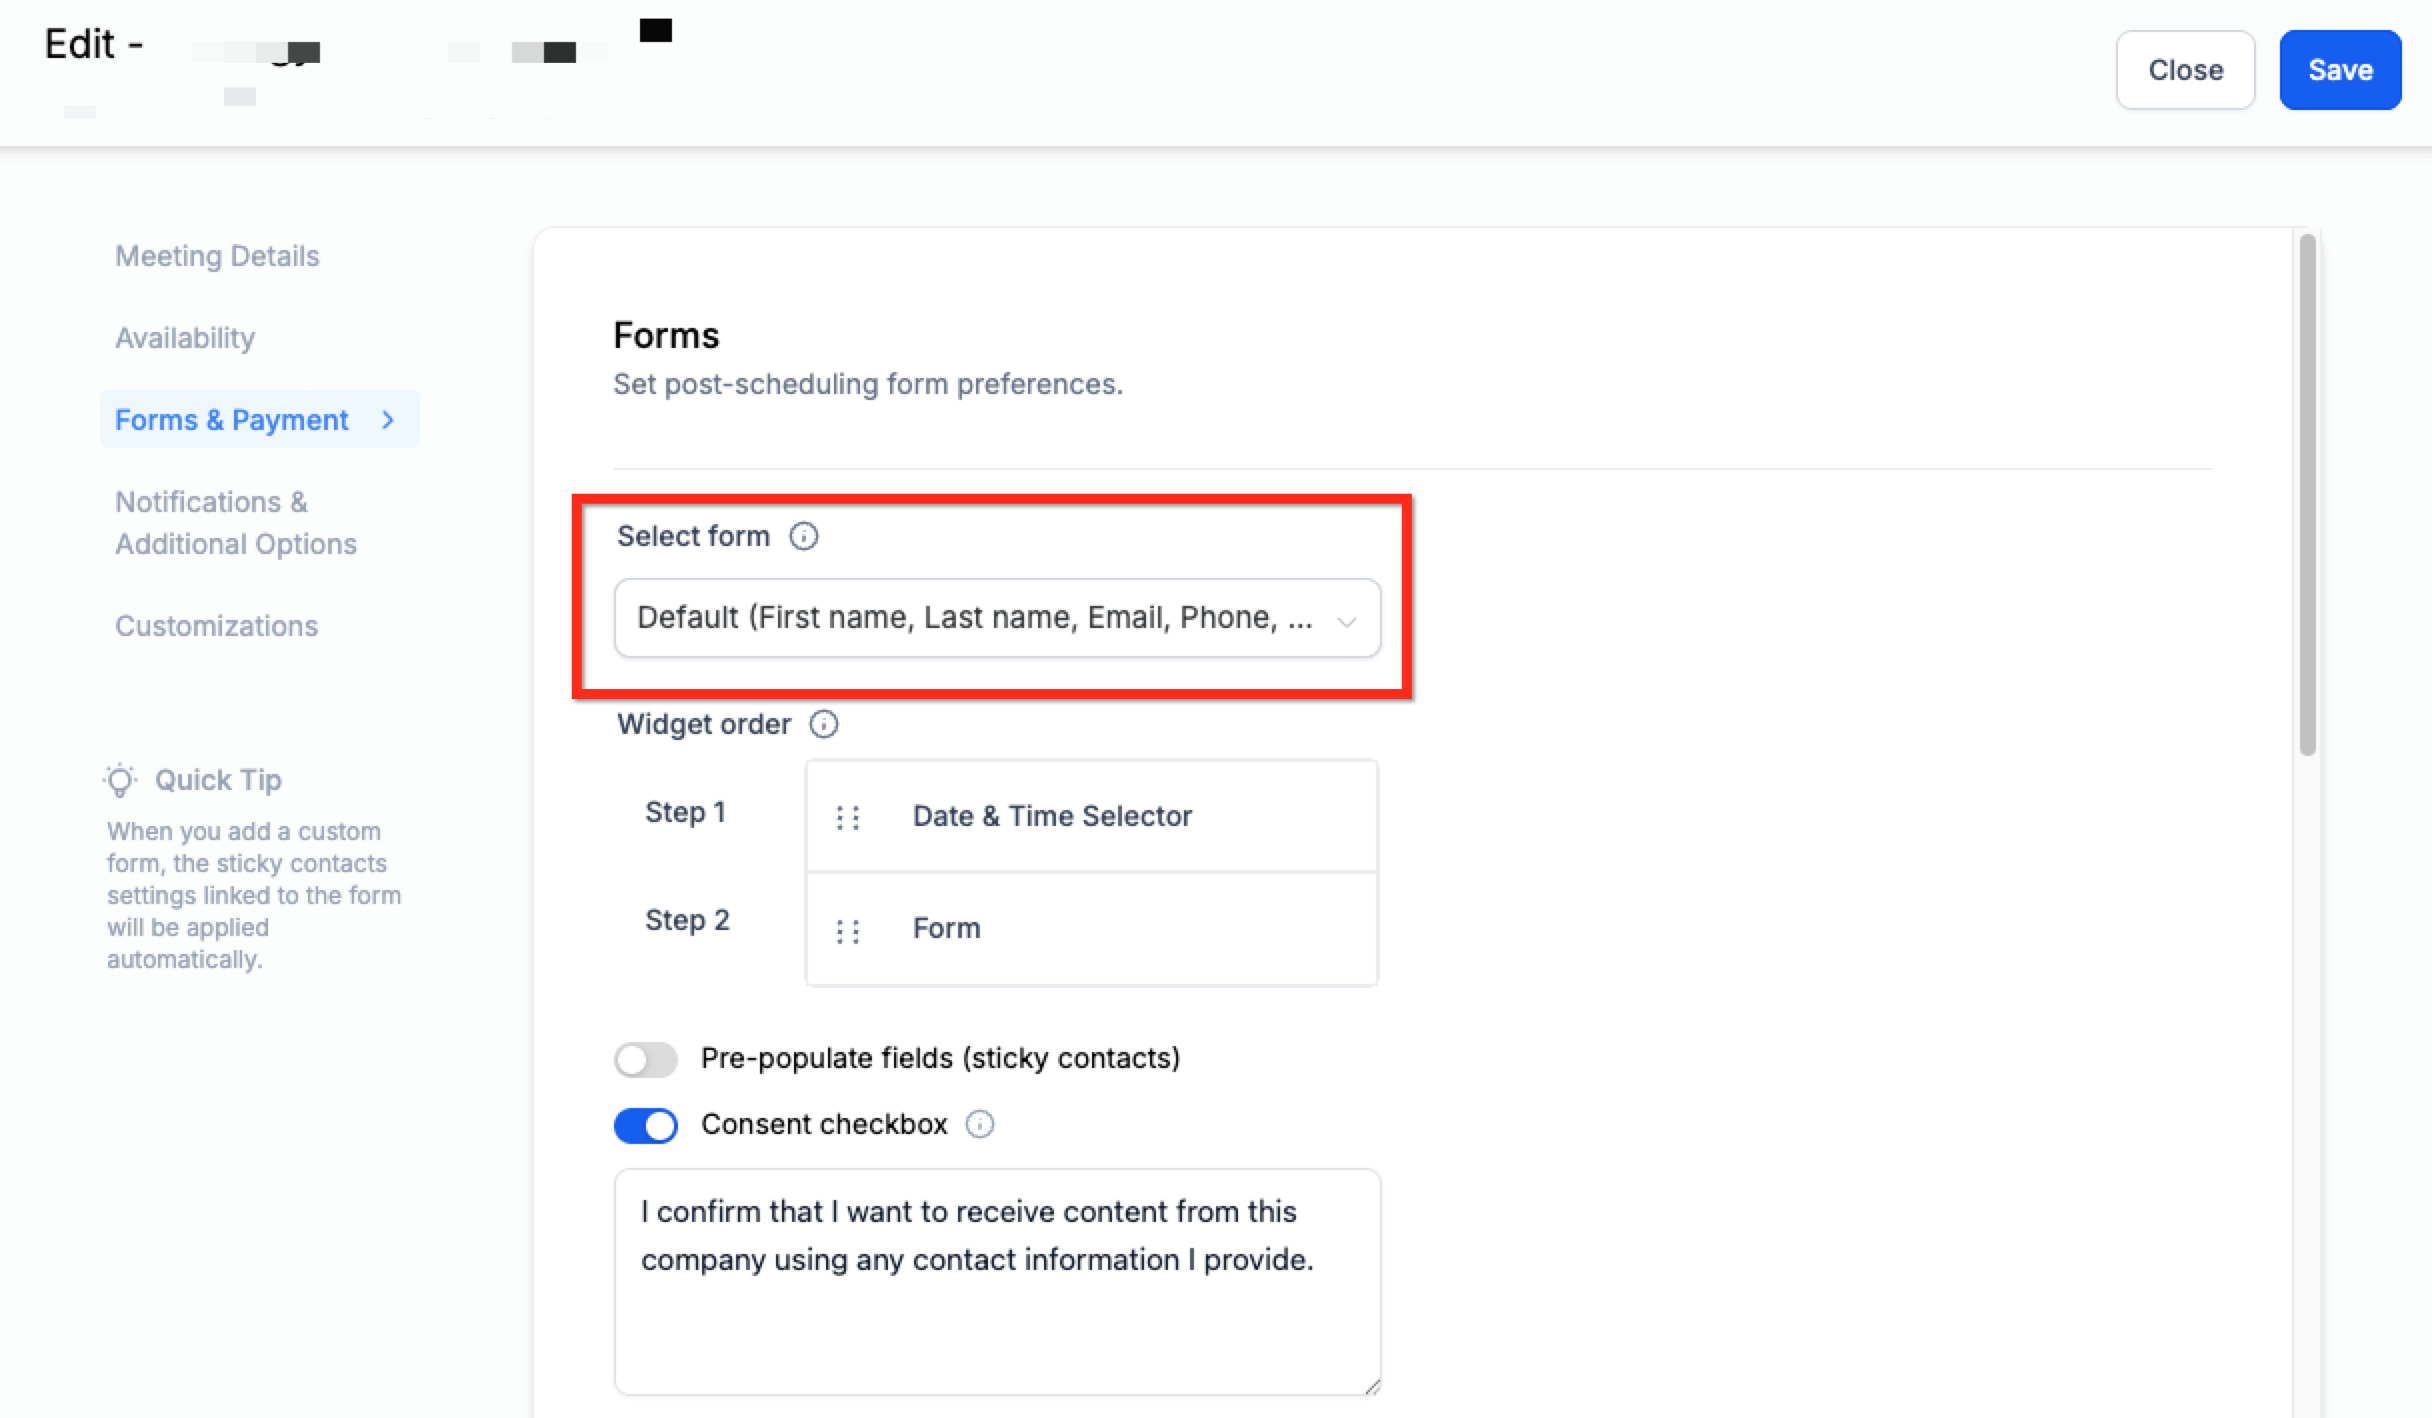
Create the form under Sites → Forms, then edit the calendar and select it under Forms & Payment. Ask only what the team will use. Map responses to CRM fields, add consent where appropriate, and use conditional logic carefully. HighLevel stores the submitted form data after the visitor completes the final booking action.
Step 7: Configure payments when required
Connect a supported gateway under Payments, enable payments for the calendar, and decide whether to collect the full amount or a deposit. Review taxes, refunds, cancellation policy, recurring charges, coupons, and guest pricing. Run a low-value test transaction and verify the order and appointment records.
Step 8: Customize the booking widget
Under Advanced settings → Widget appearance, choose colors, button text, logo, detail visibility, and the confirmation experience. Preview on desktop and mobile. A beautiful widget does not compensate for unclear service names, excessive questions, or missing timezone information.
Step 9: Add confirmations and reminders
Use calendar notifications or the Appointment Confirmation + Reminder workflow recipe. Send an immediate confirmation, a reminder before the appointment, reschedule and cancellation messages, and an internal alert when staff needs to act. Prevent duplicate messages when both native notifications and workflows are enabled.
Step 10: Connect personal calendars and video tools
Open the Connections area and connect Google Calendar, Outlook, iCloud, or supported conferencing tools as needed. Confirm which calendar writes appointments and which calendars only block conflicts. Test all-day events, recurring events, timezones, and travel buffers.
Step 11: Copy the link or embed code
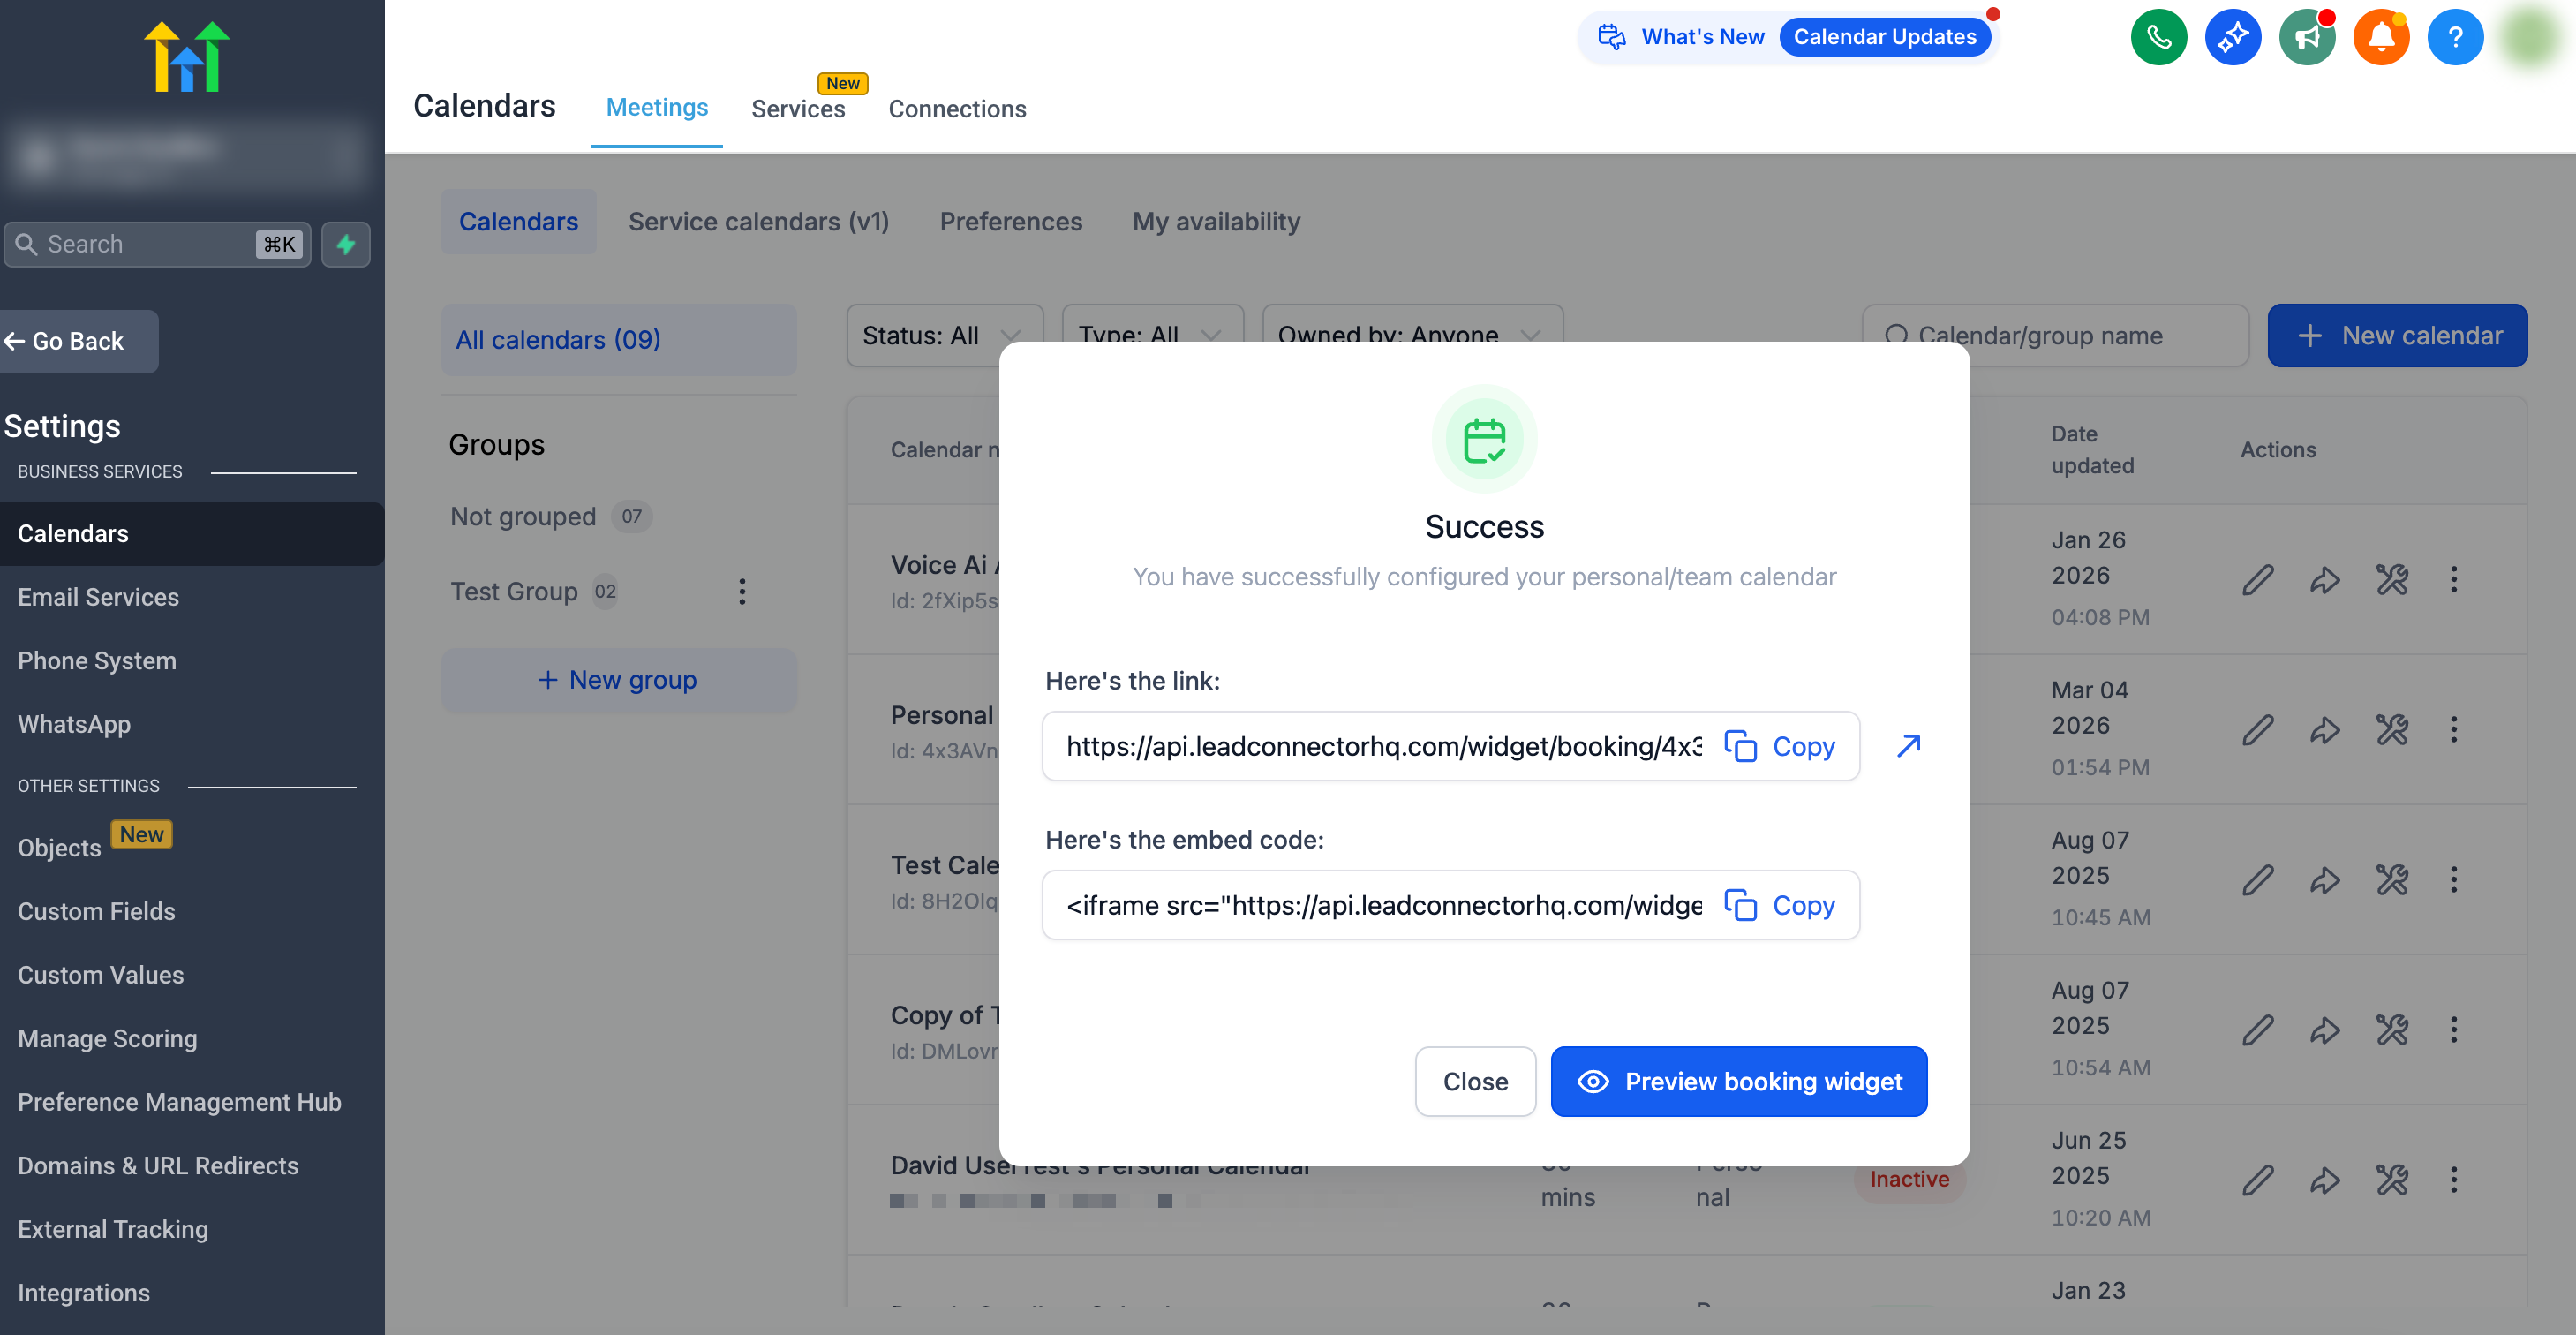
Open the calendar and click Share. Copy the public link, create a one-time link, preview the calendar, or copy the embed code. On a HighLevel website or funnel, use the Calendar element. On an external website, paste the embed code into an approved HTML or custom-code block.
Step 12: Preview and test the public experience
Open the booking link in a private window. Book as a new customer, existing customer, mobile visitor, and someone in another timezone. Confirm that the slot disappears, the external calendar updates, the CRM record is correct, payment is recorded, and every notification reaches the intended recipient.
Online booking system launch checklist
- Customer-facing service name and description are clear.
- Duration, slot interval, buffers, minimum notice and availability are correct.
- Host, team, room, equipment and location rules are correct.
- Google, Outlook or iCloud conflicts are tested.
- Timezone appears clearly and converts correctly.
- Form fields map to the intended CRM fields.
- Consent and policy links are reviewed.
- Payment, deposit, refund and coupon rules are tested.
- Confirmation, reminder, reschedule, cancellation and follow-up messages work.
- The page works on mobile and external website embeds.
- Analytics and source tracking are enabled.
- A staff member knows how to troubleshoot and manually book.
Common mistakes when setting up an online booking system
- Choosing the wrong calendar type: a class, collective meeting, service menu and round robin calendar solve different assignment problems.
- Publishing raw working hours: add buffers, preparation, travel and minimum notice.
- Not connecting conflict calendars: the booking page can offer times that are already occupied elsewhere.
- Asking too many questions: every unnecessary field adds friction.
- Hiding the timezone: this causes avoidable missed meetings.
- Duplicating reminders: audit native notifications and workflows together.
- Skipping the confirmation page: tell customers what happens next and how to change the booking.
- Testing only as an administrator: use a private window and real email, phone and payment test data.
Frequently asked questions
How to make an online booking system without custom development?
Use a no-code platform such as HighLevel. Configure calendars, availability, forms, notifications and payments through the interface, then share a hosted link or embed the calendar on your website.
How to set up online booking system for multiple staff members?
Use Round Robin when appointments should be distributed among available staff, Collective when several team members must attend together, or Service Calendars when customers choose services and staff.
People search “how to create a online booking system.” Is that different?
No. It is a grammatical variation of “how to create an online booking system” and the implementation steps are the same.
Can customers pay when they book?
Yes. HighLevel supports calendar payments through supported gateways. Available payment behavior can vary by calendar type, widget and service experience, so verify the current documentation and test transactions.
Can I embed the booking system on WordPress?
Yes. Copy the HighLevel calendar embed code and paste it into a Custom HTML block or approved page-builder code element. Test width, height, mobile behavior and cookie or analytics requirements.
How long does it take to build?
A basic one-person calendar can be configured quickly, but a production system should not launch until availability, conflicts, forms, payments, notifications, timezone behavior and analytics have been tested.
Create the smallest complete booking journey
The goal is not to configure every available feature. The goal is to create the smallest complete journey that lets the right customer book the right service with the right person at a valid time—and then receive the communication needed to attend.
When you understand how to create an online booking system as an operating process rather than a calendar link, the setup becomes easier to maintain. Start with one calendar, document its rules, run controlled tests, and expand only after the first journey works reliably.
Put your booking system online today
Launch branded calendars, forms, payments, reminders, CRM automation and website booking with HighLevel.
Start Your 30-Day HighLevel Trial
Affiliate disclosure: we may earn a commission if you start a trial through this link, at no additional cost to you.
Related Posts